February is a good time to prepare your vegetable garden for planting. But before you get too eager and start sowing seeds, do some preparation of the soil first. Here are some tips and guidelines any good Sedona landscape designer would tell their clients:

1) Check the condition of the soil.

Did the plants perform as expected? Was the soil amended properly last year? Does it have good drainage? Is it still too clayey? You may want to take a soil sample and have it tested by the local County Extension office. Here is a list of soil testing companies   that can provide soil analysis.

You can have the Ph of your soil tested for free by the local extension office in either Prescott or Camp Verde.

Turn over the soil after folding in some organic matter, mulch or compost. If you do get a soil analysis, add the proper nutrients and other amendments necessary before you turn over the soil or use a roto-tiller. This will help compost any mulch or leaves you added and improve the tilth of the soil.

2) Check your irrigation system

If you have your garden set up with an automatic irrigation system, Depending on the type of irrigation system you are using, make any changes you need such as fixing leaks, adding a spray head, etc. If you have underground pipes, know where they are before you dig. You may want to make a diagram of the piping so you don’t forget from year to year.

If you use above the ground drip tubing or soaker hoses, pull that all away so you can properly amend the soil. Were all the planting beds getting adequate water from your system? You will need to make adjustments as you put the irrigation back in place.

I use an overhead spray system after starting out with soaker hose tubing. I found the soaker hoses were not releasing the same amounts of water from the beginning of the hose to the end resulting in patches of the garden getting over saturated. The overhead sprays provide complete coverage of the soil. Although this is not considered the best method for water conservation, it suits my needs for vegetable garden irrigation.

3) Plan your garden

Sedona is at the 4500 foot elevation level more or less, so we are right between the two ranges that differentiate lower Arizona from the upper elevations of northern Arizona.  Here is a list of when to plant vegetables in Arizona  depending on your region.

http://ag.arizona.edu/pubs/garden/mg/vegetable/guide.html

Cool-season vegetables include beet, lettuce, broccoli, spinach cabbage, carrot, onion, pea, potato, radish, and turnip. Cool season plants are frost tolerant and germinate in cold soil so they can be planted in winter or early spring depending on location. These crops need to mature during cooler periods rather than in the heat of the summer, so getting them out early in the garden or starting them in a mini greenhouse indoors is important.

Warm-season vegetables include sweet corn, sweet potato beans, cucumber, melons, pepper, pumpkin, eggplant, squash, and tomato. These are not frost tolerant and need warm temperatures to set their fruit. Temperatures too high will reduce quality such as sunburn, discoloration and less than ideal size.

Compensate for the mistakes and lessons learned from last year’s crop. Did you plant too many seeds of one type all at once and ended up with too much at one time? Be patient and stagger your seed plantings. Plan out a schedule of when to plant what and mark it on a calendar. It only takes a few minutes to sow some seeds.

Planting from seed is a lot cheaper than buying little 4” pots already leafed out. Consider planting early even before it may freeze again. Who knows when the last frost will occur and if you get lucky, you will have a head start, if not, you will not have lost much in your investment. But do wait till after the last frost or say mid April before you invest a lot in those 4” pots and risk losing them to a late frost.

4) Container plantings

In the practice of landscape design, the use of pots and containers adds an accessory element to the overall design. Pots are useful to feature individual plants and to decorate a patio area. Pots are suitable for many types of vegetable crops, especially vines types. I like to group pots and place a trellis behind them. If you have a lot of empty pots that you don’t otherwise need for perennial or annuals plants, you may want to use them for vegetables.

Be sure that the pot is big enough to handle the growth of the root system regardless of what type of plants you choose. Too many homeowners have collections of small pots and never invest in buying larger sizes to transplant their plants. Use these smaller pots as transitional containers as the plants grow just like nurseries do with 1 gallon, 2 gallon and 5 gallon containers.

Every landscape design in Sedona should have a garden of vegetables, perhaps sprinkled with some ornamental flowers and herbs. Adding colorful pots in strategic spots will make your garden look like you put some thought into the design and aesthetics.
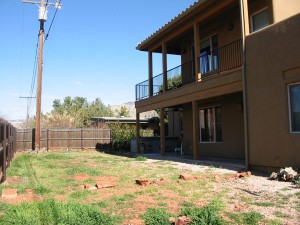
A backyard with no landscaping is not a very desirable place to hang out, nor to look upon from the inside. That is what these clients were faced with when they decided to live full time in their Sedona home they had been renting out. I came over to take a look after they called me for a free consultation for a landscape design. While on site, I gave them numerous options on how to situate everything so that it looked well planned and then agreed to come up with a formal design (below).

The yard is about 20 feet deep, has a small covered patio and an above the ground spa. Their needs and wants were pretty straightforward: a place where they could entertain, hang out with friends and create a much more useable patio and outdoor living area.

Their wish list was basically the following: a built in bbq island, a fireplace, new extended patio flooring (they were sold on concrete pavers), and a small lawn area for their dog. Of course, trees and shrubs would be included as well in the overall landscape design.

Sounds pretty typical for a outdoor entertainment area, functioning as an extension of the home and incorporating the existing spa. So the next step would be to explore various locations of where to place these features both in a functional and aesthetic manner.

One big issue however, is the electric powerpole in the right rear corner and a electrical access box at ground level a few feet away. I knew there must be some kind of restrictions about building or planting shrubs too close for them to have access. There may even be some kind of easement as well. Once we find out what the restrictions are, we will adjust the design as necessary, but for now, I think the design works very well given the size of the yard and the views from the inside.

I placed the bbq island with the understanding that there would be some distance required to access the electrical equipment and powerpole. The island was placed in such a way as to use its bulk as a screen. Bamboo would be planted to help mitigate the objectionable powerpole — at least at eye level for the first 10 feet or so.

The fireplace was also placed towards the perimeter of the patio area and situated as a focal point of the backyard. Clearly visible from all windows of the house. The hearth has extended bench seating on each side of the firebox giving it width and angled to reflect the fortyfive degree angles used to accent the patio configuration and the bbq island. The fireplace will be a simple design, stucco and painted to match the house which is of a southwest territorial style.

The paver patio narrows as it follows the narrow covered patio effectively widening the four foot wide walkway leading to a bedroom door by another four feet. This allows improves the flow from that door and makes the backyard seem much bigger because there is now much more hard surface to walk on.

The patio ends and meets an island area for plantings which forms a transition between the paver patio area and the lawn area. It was decided due to the relatively small area involved, that synthetic turf would be a good choice eliminating the need to water, mow and deal with potential dog related issues creating brown or yellow patches in the lawn.

We will get started once the utility issues are understood and the necessary permits are obtained from the City of Sedona. Future blog posts will track the progress.

The real landscape design issue here is twofold: 1) how to deal with the powerlines/powerpole and 2) where to place everything. This design came together rather quickly for me as the clients already knew exactly what things they wanted and just needed a landscape design professional to show them how it would look arranged within the site limitations of their Sedona backyard.

A large backyard remodel in the Village of Oak Creek started out having nothing in it except gravel and a couple decks that kept the new owner wondering, what could or should I do with all this space in the backyard?

Working with this out of state client over the phone and internet, I began the landscape design process starting with a few conceptual ideas. They did want a pool, a gazebo and some kind of connection that integrated the two. The clients concept was taken from a picture in a magazine and they wanted me to apply the concept to their yard and make it work — and of course, look beautiful.

The client’s preferred style was contemporary, clean lines and simplicity.

The most difficult part of this was to make the elements visually interesting and relate to the house — which is angled which effectively creates two separate areas.  You can see in the design below how the yard relates to the house.

The pool was angled to reflect the angle of the house. This served to functions: 1) to create a focal point from the great room to view the deck jet waterfeatures designed into the backend deck of the pool; and 2) to relate to the ramada view deck which was 30 feet away and at a 45 degree angle.

The connection between the two use areas was a raised water channel that starts out as a fountain and then flows down the channel into the pool. The channel was a visual feature that is highlighted when looking down from the observation deck. We raised the back edge of the channel so that at ground level, one could see that it was lined with tile and served as a strong horizontal statement that guided the eye between the two ends of the pool.

Sitting under the view deck, the waterfeature basin contains a contemporary stainless steel fountain consisting of 3 tiered cylinders that creates a vertical movement of splashing water at the view deck end of the yard. At the far end of the view deck is a fire pit also designed in a contemporary fashion using oblique shaped planters set on pedestals. Cobalt blue fire glass was used to reflect the waterline pool tile.

The view deck and fire pit were designed in an axial symmetrical layout tot the french doors accessing the game room and primary entrance to the backyard towards the east side.

At the west side featuring the pool, the deck jets (also fiber optically lighted for night time effects) lines up with the primary view from the great room and front entry. Between the house and the water channel is an expanse of synthetic grass which gives the landscaping part of the design a clean look.

From the view deck patio, we created stairs to descend the slope down to the spa level where a new portable spa was built and integrated into the existing raised master bedroom wood deck. Against one side of the spa, we built a sit up bar with cantilevered counter top using the cobalt blue and glass tiles used in the waterline of the pool.

This kind of project is time consuming because of all the hardscape, infrastructure, grading, drainage and permits involved.

The final video images have not been taken as of this post, but I do have a mid way progress (in the middle of construction) video that I took from time to time to update the clients. Please forgive the unprofessional quality — its a rough “here is what is happening” type of video not a slick production.

The one disappointing thing about the project is that the clients decided to hold off installing or even thinking seriously about the plant material until they had time to absorb and take in the yard. In hindsight, I would now tend to agree since they had not even lived in the house to provide any meaningful reaction to my proposed plantings, nor have a grasp on the kind of plants that grow in our region. It just makes the project look somewhat unfinished, especially when I attempt to share it pictures and videos.

I’m not complaining and am grateful for the opportunity to share my skills, design ideas and construction knowledge with my clients regardless of the size or type of project here in Sedona.

Outdoor rooms extend the useable living areas of the home. Sometimes they are adjacent to the home itself as in a covered patio. Sometimes they are fully detached and separate from the residence and have their own roof structure.

A simple shade structure may or may not be designed to create the feeling of an outdoor room, because it may only be designed for shade as the primary function. In this case, do we want total shade as in creating a solid cover, or do we want partial shade which allows light to filter through an open beam structure?

Most shade structures are not designed as outdoor “rooms” unless they have some kind of wall or enclosure that defines the area under cover. The furniture and other amenities that are placed in the space also define how well the ambiance feels like an true outdoor room.

Today, many pieces of furniture and fabric can withstand the elements including area rugs. Some outdoor speakers are also designed as water resistant.

Look at this slide show of projects I have designed and built giving some examples of Ramadas, Gazebos, View Decks and other structures and spaces:

 Page 2 of 2 « 1  2 
/* */
Verified by ExactMetrics